Installation
Downloading and running SimFeedback
- Download release from https://github.com/SimFeedback/SimFeedback-AC-Servo/releases
- Extract into any location you like on your PC
- Run remove_blocking.bat file as administrator.

- Now you can run simfeedbackstart.exe
Always start and change profiles from fully lowered position
SimFeedback doesn’t have any calibration/know where the actuators are. It always assumes when it the start button is pressed that actuators are fully lowered.
It will cycle up to static holding height/starting position. So for instance if you pressed start with the actuators fully extended, it would do it’s best to extend them again.. it’s a gamble whether something would break or there would be over load protection and the servo drives would shut off.
In practise this is a non issue as the minute you stop or power off the rig will fully lower (if not stand on it). Where this starts to be a problem is if you’re switching profiles. Just stop SimFeedback, wait till it’s lowered, then activate the new profile and start again.
Make sure you have space around your rig and actuators
Violent movements can and will cause rigs to move without having the motors break a sweat. I haven’t seen over 350watts (being generous maybe there’s 500w spikes my meter can’t pick up). Yet I’ve seen it walk 100mm across the floor in one particularly fun session in a F1 car and literally get air underneath the actuators. That’s a good 170kg+ which is staggering. So make sure you’ve got plenty of room it won’t crash into anything or crush/pull cables out.
Start at low intensity levels
I wouldn’t have believed what the system can do if I hadn’t tried for myself – it is definitely capable of breaking things. So start at low intensity levels (using the intensity slider) and build up once you’re aware of how it behaves. If you have your first crash at a high intensity level you might get a bit of a shock…
This stuff is all DIY. Obviously it’s all your own responsibility 🙂
Determine COM port
First you need to confirm which COM port that your Arduino is plugged into. Make sure you don’t have any other USB Arduino devices plugged in. You don’t want to flash them by mistake.
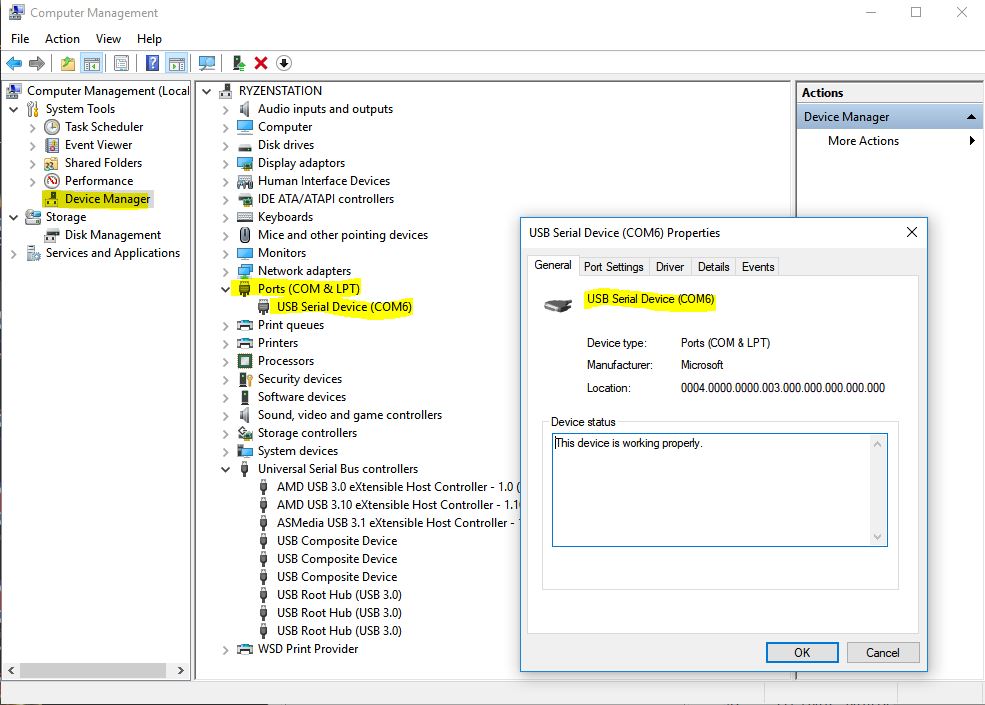
- Right Click on your Windows Start logo, select “Computer Management”
- Then when this screen opens, follow your nose to Device management
- Expand Ports COM & LPT.
- You should see a “USB Serial Device” appear with a COM number beside it (like my COM6 below)
- If you’ve got more than 1; unplug your Arduino and plug it back in to see which one it is
Flash the Arduino
Next we need to “Flash” the Arduino firmware. In simple terms, that’s putting in the software that SimFeedback controls into the Arduino – which in turn tells the servos what to do. You only need to do this once.
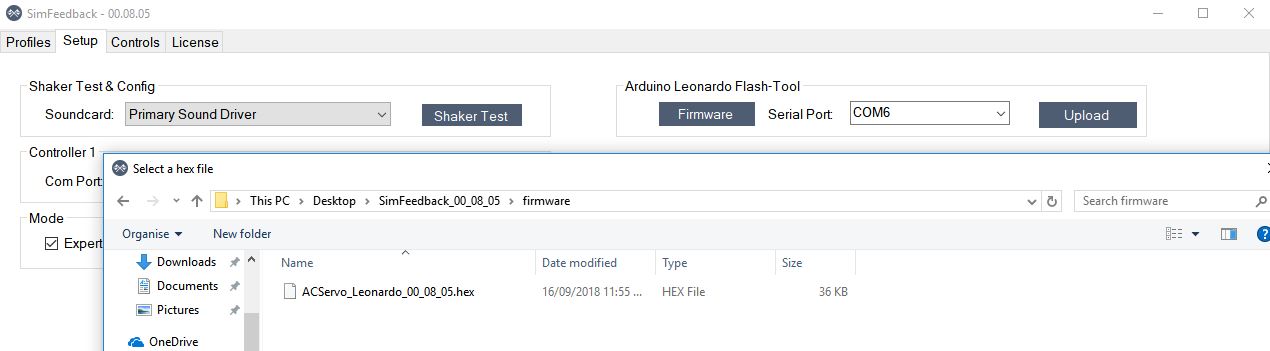
- Load up SimFeedback
- Goto Setup Tab
- Click on the Firmware button select your firmware from inside the SimFeedback/Firmware folder (the .hex file)
- Select the COM port that the Arduino is on
- Press Upload
- Wait for it to do it’s thing. Done !
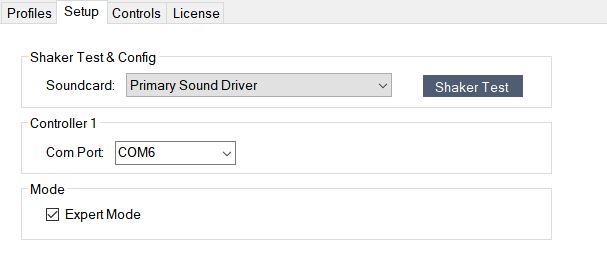
Let SimFeedback know which COM port the Arduino is on
- Finally set the Controller 1 COM port that SimFeedback uses to the same COM port
 That was easy. let’s go to the next bit. But first some light reading….
Getting the data from the game via telemetry providers
SimFeedback has various telemetry providers. These are plugins for each game that is the magic that allows SimFeedback to receive physics & game data. Each game is different and some are more fiddly than others to setup. There is a list of games here that are supported, and you need to join the official Discord in order to get additional things that aren’t here. Eg there is a DCS plugin in progress from one of the community guys.
Any that Saxxon makes appears on the official GitHub account. https://github.com/SimFeedback/SimFeedback-AC-Servo/wiki/Supported-Games
Grouping together settings in a profile
SimFeedback ships with a bunch of default profiles for you to start with. A profile which is a specific configuration of how your actuators will behave for the corresponding output of the game. You can have more pitch, less roll, faster actuator speed etc. You need these profiles as cars vary dramatically in behaviour. If you tune the rig to suit say a Celica GT4 to get some good feedback, then use that same profile for a 1991 F1 car you will likely loose some fillings.
Controlling your platform through Effects
And finally the fun bits ! A profile groups together a series of 1 or more effects together. You can use the inbuilt effects or configure your own if you’re really inquisitive.
You’ll get to know these effects. Surge, Heave, Sway, Roll and Pitch these map roughly 1:1 with output from games. There are other effects that are more to give you queues as opposed to real dynamics. Such as traction loss that takes a slip angle and creates an effect based on that.
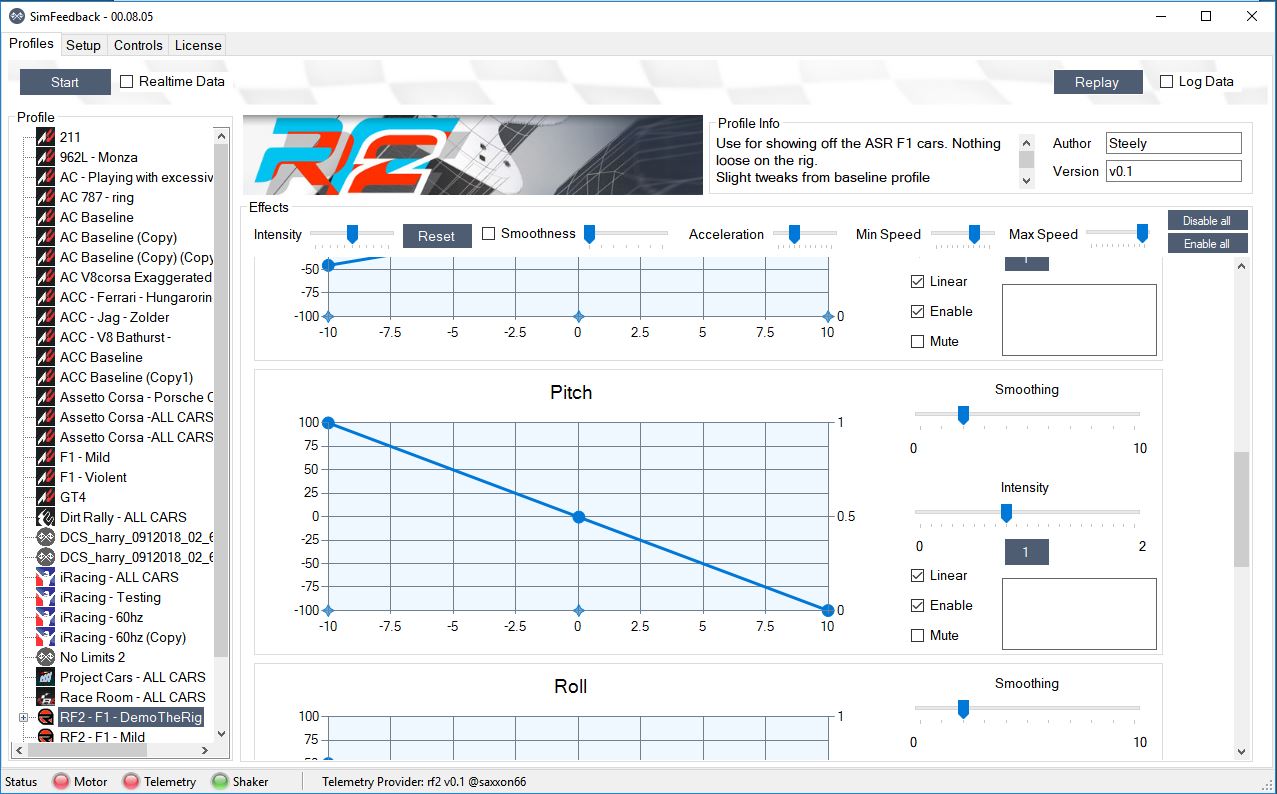
Each effect has control levels to turn them on/off, change their behaviour and intensity. Along with global controls to change behaviour. This can be a little overwhelming, but you’ve got some sensible defaults to start with so don’t worry !

- (a) Start Motion button, changes to a Stop button once started and vice versa (b) Realtime Data – click this to get readouts of what the game is doing
- Motion Profiles with the active one highlighted
- Selected Profile notes
- Global Effect controls
- Specific Effect(s) for current profile
- Status Indicators
First platform test
We need to test the rig to make sure everythings working and there’s not an obvious wiring fault. So do this without any games running.
- Make sure USB for the Arduino is plugged in, Servos powered on
- Just right click on a profile and click “Activate”, to select the profile.
- The Telemetry light should be red
- Press the Start button. The rig will cycle up to it’s start position and motor light turn green.
- Press the Stop button and it will cycle back down, once it reaches the last 5mm it will do so very slowly.
Make sure you do that first to see that every things working and returning to where it should be.
The moment you’ve been waiting for
Next up let’s get our first game running. Let’s use Assetto Corsa as there’s nothing special to get the telemetry working on it, you just have to have it running with a car in the pits and telemetry will start streaming to SimFeedback.
Tip: As a general rule you want to copy a profile and play with a copied profile, as you will at least for the first month or so always be playing with effects values. You want to keep your originals pristine and only work off copies.
- Select the AC – All Cars profile
- Right click
- Make a copy of it
- Now Activate your copy
- For the first test, you want to turn the intensity level down (say to 0.5) make sure it’s all ok
- Run Assetto Corsa; choose something like Brands Hatch and a milder car say the 211
- When SimFeedback begins receiving telemetry in the pits it will jolt into position of where the car is; depending on profile, and car position this can be a bit un-nerving. Especially in Assetto Corsa Competizione ..
- Go for a drive
- See you in 30mins marvelling in your new toy 🙂
Did you have problems ?
A couple of easy mistakes to make :
Actuators feet not remaining on the ground through movements at this point actuators should always have their feet on the ground with the exception of a violent crash. If you have one actuator’s foot off the ground through gradual movements you’ve got two motors assigned incorrectly. Go back and check your wiring for which is the correct motor positions.
An actuator not working correctly either not pushing up, or lowering – more than likely a GND wire problem on your controller box. Go back and check your wiring paying close attention to the ground wires.
No motor connection/output at all if you’ve changed to a different plug on the PC, recheck your COM ports and adjust in SimFeedback accordingly.
Just like in real life, simulators replicate physics such that there is a dramatic difference between cars and tracks. Look at some of these old F1 videos and you wonder how they must have felt getting out of their cars.
To a greater or lesser degree the physics engines replicate this and telemetry outputs it. The rig does not know what vehicle it’s input. So if you setup a profile for a nice gentle softly sprung machine, and take that same profile and use it on an F1 car you’re likely to get shaken to bits.
Tracks also make a huge difference. Take a smoothly paved FIA class race track and compare to the Nordschleife again massive differences.
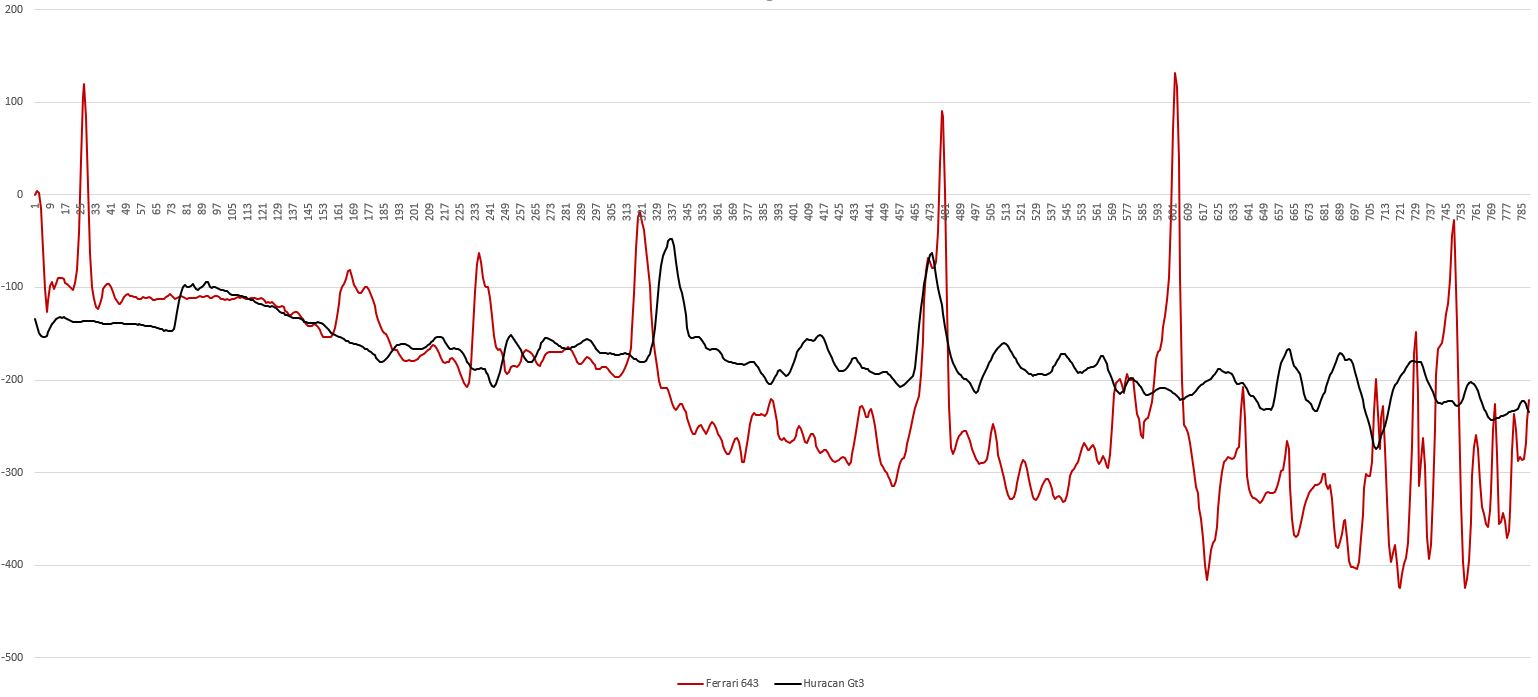
Let’s look at this graphically. This is the main straight of Silverstone, identical SimFeedback profile, standing start with a Lamborghini Huracan GT3 (black) vs a Ferrari 643 Formula 1 car (red). Note the amplitude of the lines and gear changes are dramatically different in the F1 car. Eg one of the gear changes goes from -300 units to +100, whereas the GT3 is going from -200 to -50 ish.
With this in mind you’ll likely want different profiles to have in your rig. Ones you use for showing off to your mates, ones that you will use for long sessions. Some cars just need some tweaks to compensate or dull off things you don’t like. So let’s see how to adjust things…
SimFeedback when you download it has a standard mode. This is free to use (for non-commercial use) and is completely useable to drive your SFX-100 with some configuration ability.
Expert mode is accessible by making a donation. This enables greater adjustment and features of SimFeedback
- Fine grained motor control
- Individual setpoint graphs for each effect
- Setpoint profiles behaviour (linear vs nonlinear)
- Realtime data output
- Actuator output logging
You can see the differences between standard and expert mode below:
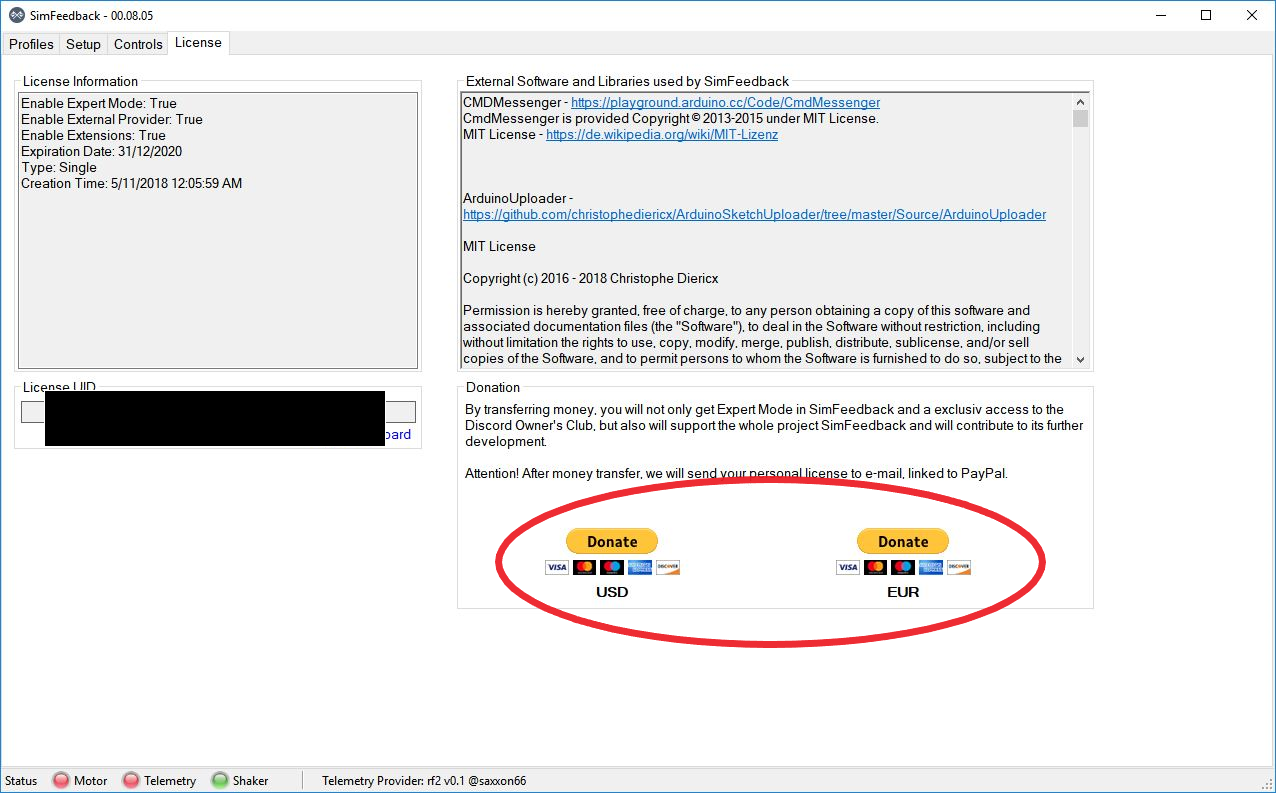
Getting Expert Mode
First off to get access to “Expert” mode and to support ongoing dev work/say thanks, you should donate – you also get access to the Owners Discord Server. This tutorial assumes you’ve donated.
- Download SimFeedBack from here https://github.com/SimFeedback/SimFeedback-AC-Servo/tree/master/Releases
- Extract Zipfile and run simfeedback.exe
- Click on the License tab
- Click on the Donate button highlighted.. you’ll be taken to PayPal, do your donation.
- You’ll get an email in a day or two with your license key to put in the box below (mine blacked out obviously) along with a link to the Owners Discord.
All parts of this tutorial that reference Expert mode will have this label Expert
You have a number of things at your disposal to change how the SFX actuators behave – some more advanced settings are only available in expert mode.
AC Drive Settings
- Physical servo drive RPM setting. The suggestion is start at 1200rpm, and increase to 3000 rpm (https://github.com/SimFeedback/SimFeedback-AC-Servo/wiki/AC-Servo-Settings). I’m sure most people just went straight to 3000rpm.. official recommendation is get used to things first at 1200, then increase.
Global Settings
- Intensity – this is a global multiplier for values from the game. So for instance the game says “braking at 2g” set the intensity to 0.5 then 1g is sent to the effects that key off it. Be careful trying to adjust this while you’ve got the rig running; for instance if the rig is pitched down, and you increase the intensity the rig is going to pitch further down (more or less) as quickly as you move your mouse…
- Smoothing – As the name says will make things more/less harsh and get rid of “spikes”. If you’ve got a super rough racetrack you can apply some smoothing to make things a little nicer. If you want to have more raw feeling then drop it down. Note you need to tick the checkbox to enable this.
- Expert Acceleration – this defines how quickly the motors spin up, left is faster! Particularly noticeable in small suspension oscillations/rough surfaces.
- Expert Min speed – Whats’ the starting speed of motors. Seems to soften tracks a little. Note the motors are driven by PWM pulses, these are the min and max pulse rates respectively.
- Expert Max speed – How fast to spin the motors up to.
You’d argue that you just want to set everything to the extremes, however that would result in a pretty much an awful experience.
Individual Effects
The next thing is adjusting the actual effects. Let’s go through what they do:
- Heave this the feeling of the car going up/down ie a bump in the track or bouncing over a curb. Probably what makes a platform mover the bees knees. It really does make the track come alive
- Pitch this is the feeling of the car angling backwards or forwards as you go up/down a hill. This also affects the feeling of heave as the car bounces up and down through bumps it will naturally angle back as well as rise up the track surface – the shorter wheelbase the more pronounced this will be
- Roll this is the feeling of the car leaning to the left or right. Eg when one wheel is up on a curb on the right, the car will lean to the left, or if the track is banking through the corners
The following are not effects as such, but motion synonyms/equivalents from other simulators. They use pitch/roll effects.
- Surge cueing* g-forces through accelerating or decelerating. On the throttle the rig will rock back, change gears you get a “shunt” forward then back, braking pushes you forward.
- Sway cueing* g-forces using the lateral g if you turn right g-forces would push you to the left. This tilts the rig right/left accordingly.
This next one is it’s own type of special effect.
- Traction Loss this is an “emulated effect” of pitching the rig left or right to give you a hint that the slip angle is going too far. It will initiate quickly to indicate loss then return slowly
There are other effects for output to a sound card/bass shakers. I haven’t tried this out (yet) so can’t comment on it.
This gives you the ability to exaggerate, or reduce each effect to suit you.
* More than you wanted to know about Motion Cueing : https://www.amm.mw.tum.de/en/research/completed-projects/motion-cueing/
Effect properties
Each effect can be modified in various ways
- Expert Setpoints Graph SimFeedback uses the graph to map input value to the ‘target’ output value. So for instance at in input of “5” on the bottom axis, then set the output to around 20%. All of the other settings (motor speed, acceleration, linear) are used for “how” it gets to that target. %age correlates to actuator position. 0 = centre, -100% = bottom, +100% = top
- Smoothing as the name implies applies a smoothing filter.
- Intensity ramps the input value for the Target Graph up/down accordingly.
- Expert Linear defines how it will move from it’s current value to the value in the graph. Linear will be straight line. Non linear will follow a “easing” or Sine curve to get there.
- Enabled checked this means the effect is enabled, unchecked turns it off completely
- Expert Muted means the effective is enabled, but not outputting to the motors, so when looking at realtime values you can still see what it’s doing.
Expert Modifying effect graphs
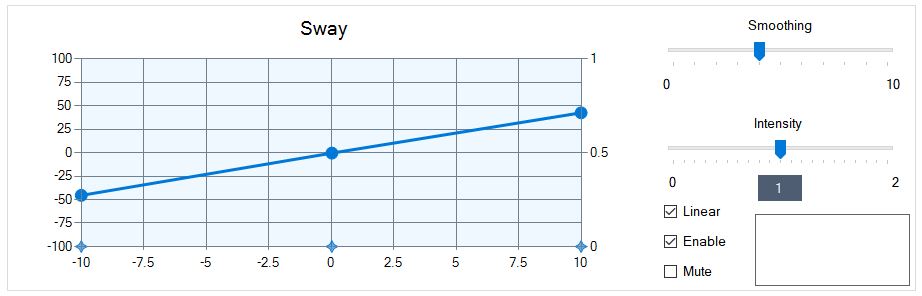
Let’s look at the Default AC Profile – Sway effect. Some people like it reversed, so it’s a good exercise to learn how to change things. Lets look in detail at an effect:
- Copy the AC Profile
- Rename it by clicking in the name of the copied profile.
- Scroll down in the main window till you see sway
- Click and drag the points like so – note you need to click just to the left or right of each point as indicated. When you click and hold you’ll see it’s current value eg “-50”:
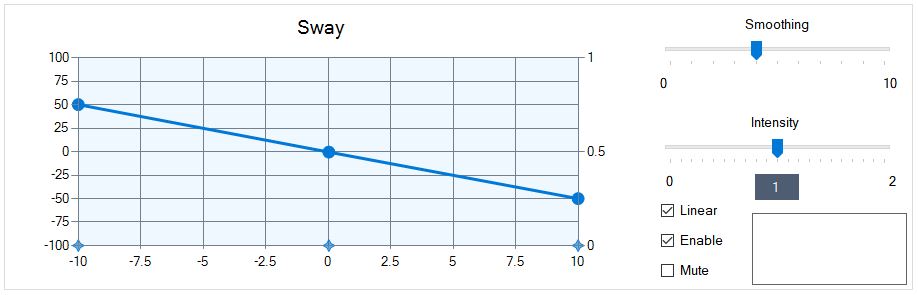
- Now go for a drive
- You can increase/decrease the effect by moving the end points up/down (OR) adjusting the intensity slider.
What else can you do ?
Expert Get realtime data you can get more of an idea of how the system is working by checking the realtime data checkbox. You’ll get a red indicator and a the number output like so telling you what’s happening

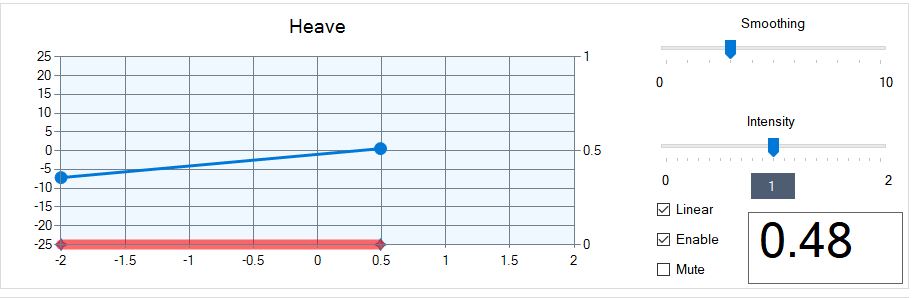
Limiting maximum output. Expert By moving the dots in from the edges of the graph you can introduce “clipping” off the forces. When the input value exceeds the position no additional movement occurs. In practise this makes something feel like it “goes dead” past that point. So for instance I took this sceenshot with live output from a game, which is registering 0.48; once it goes to 0.51 there won’t be any additional movement from the servos.
Introducing variable rates on the Setpoint Graph you can add additional points to the graph (double click on it) this will add a new point with a dark blue area beneath it, like so:
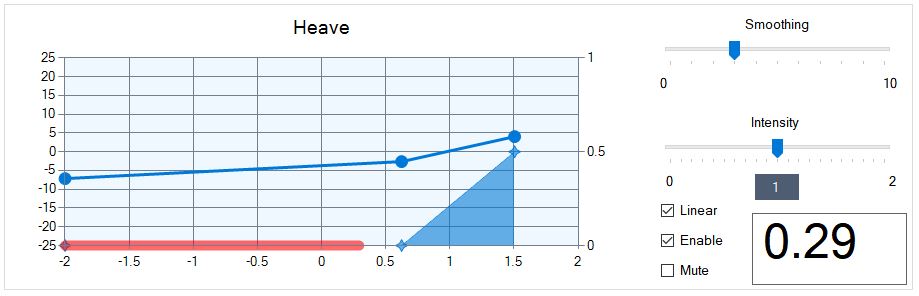
- You can add points by double-clicking on the graph
- Hold Shift Key to select and delete a point
- You can shift select multiple at a time to delete them.
The dark blue area for actuator based effects is not going to do anything. For sound based affects it changes volume, you can just pull the dark blue point down to make it invisible.
What does this mean ? you could change the feeling of each effect by making it shallower in initial travel, then ramp up, or vice versa.
Tune from the passenger seat
A handy tip. If you’ve got Assetto Corsa and want to see what this all does easily you can turn the AI driver on, and play with SimFeedback realtime to see what everything does.
It is best to tune each effect individually to get the right behaviour for each one, then fine tune them all together. You can use the enable all / disable all shortcuts to quickly turn on/off all the effects. Once you’re done tuning individually then turn them all back on and fine tune together.
- Put AC in windowed mode / one screen
- Put simfeedback side by side / on the other screen
- Remember rule #1 don’t switch profiles without fully stopping the rig
- Now start simfeedback with a profile
- Turn realtime data on
- Go back to AC, get into a Car, press Ctrl + C .. this will enable the AI driver
- You’ll notice immediately the AI driver isn’t very smooth on or off the throttle/brakes so disable the surge effect
- Now play with other effects and settings to your hearts content .. you’ll learn more about each individual setting this way
As luck (or good design) would have it the profiles aren’t stored in some closed database somewhere, they’re plain as day in the a /profiles folder ready to be shared. The official method of doing this is uploading your favourite profiles into the relevant channel in the Owners Discord (look for pinned messages in the channels).
Easy !